Setting up an M1 Mac to write AArch64 Assembly
When I write code, I like to have a split view in my terminal with my code on the left and a shell on the right. This post details how I replicated this setup when I was learning to write ARM64 Assembly for the Linux kernel.
The general idea
Since we can’t just run Linux ARM64 binaries directly on our Mac (there’s a section at the bottom on this post that explains why), we need some sort of emulation, which a VM can do. What I’m going to do is spin up a lightweight VM, and share a directory from my Mac with it. I’ll then write code in this shared directory using my editor on my Mac, but assemble and run it from the VM.
QEMU
QEMU is a lightweight emulation and virtualization platform, and is going to be our savior. Its interface can be a little unwieldy and distracting at first, so I recommend downloading UTM, which builds a UI on top of it, making it feel a lot like other virtualization apps like VirtualBox or VMWare (in a good way).
QEMU has a great guide on creating an Ubuntu VM, so there’s no point in me repeating it. I did have to change my network configuration to “bridged” mode to get networking working correctly inside the VM during installation.
When you’re installing Ubuntu, make sure you enable the OpenSSH service so we can SSH into the machine later. I would also recommend against installing Ubuntu Desktop, since we won’t ever really use the VM traditionally, so it’ll just eat up resources and battery for no reason.
After installation, empty out the virtual CD/DVD drive from UTM, and boot into the machine using UTM. Note the IP address of the VM from the greeting it shows you.
Once you’re able to SSH into the VM, I’d also recommend running it in “headless” mode, which basically involves editing the VM to remove any Displays connected to it. UTM has a guide for it too.
I like to also save this host in my SSH config (at ~/.ssh/config) so I don’t
have to keep typing in the username and IP when connecting to it:
Host vm
    HostName 192.168.1.139
    User sid
You’ll now want to install a few things on this VM. The build-essential apt
package is necessary to have access to the gcc compiler.
I also like to install fish and clone my dotfiles so the shell looks like my Mac’s shell, which helps me with immersion. I also install zoxide and eza since I use them on autopilot, and not having them is annoying.
You may also want to set up locales so you see colors properly, but I use the Kitty
terminal, which makes this very easy: instead of running ssh, I run kitten ssh.
Combined with the SSH host config from earlier, I can now get to this VM using just:
$ kitten ssh vmI’ve set up a Fish alias called vm that expands to that for even fewer keystrokes.
Finally, let’s set up directory sharing. Shutdown and edit the VM to share some directory from your Mac. You can also share a single one, so make it as broad as you’ll need. I’ve shared the directory I store all my code in:
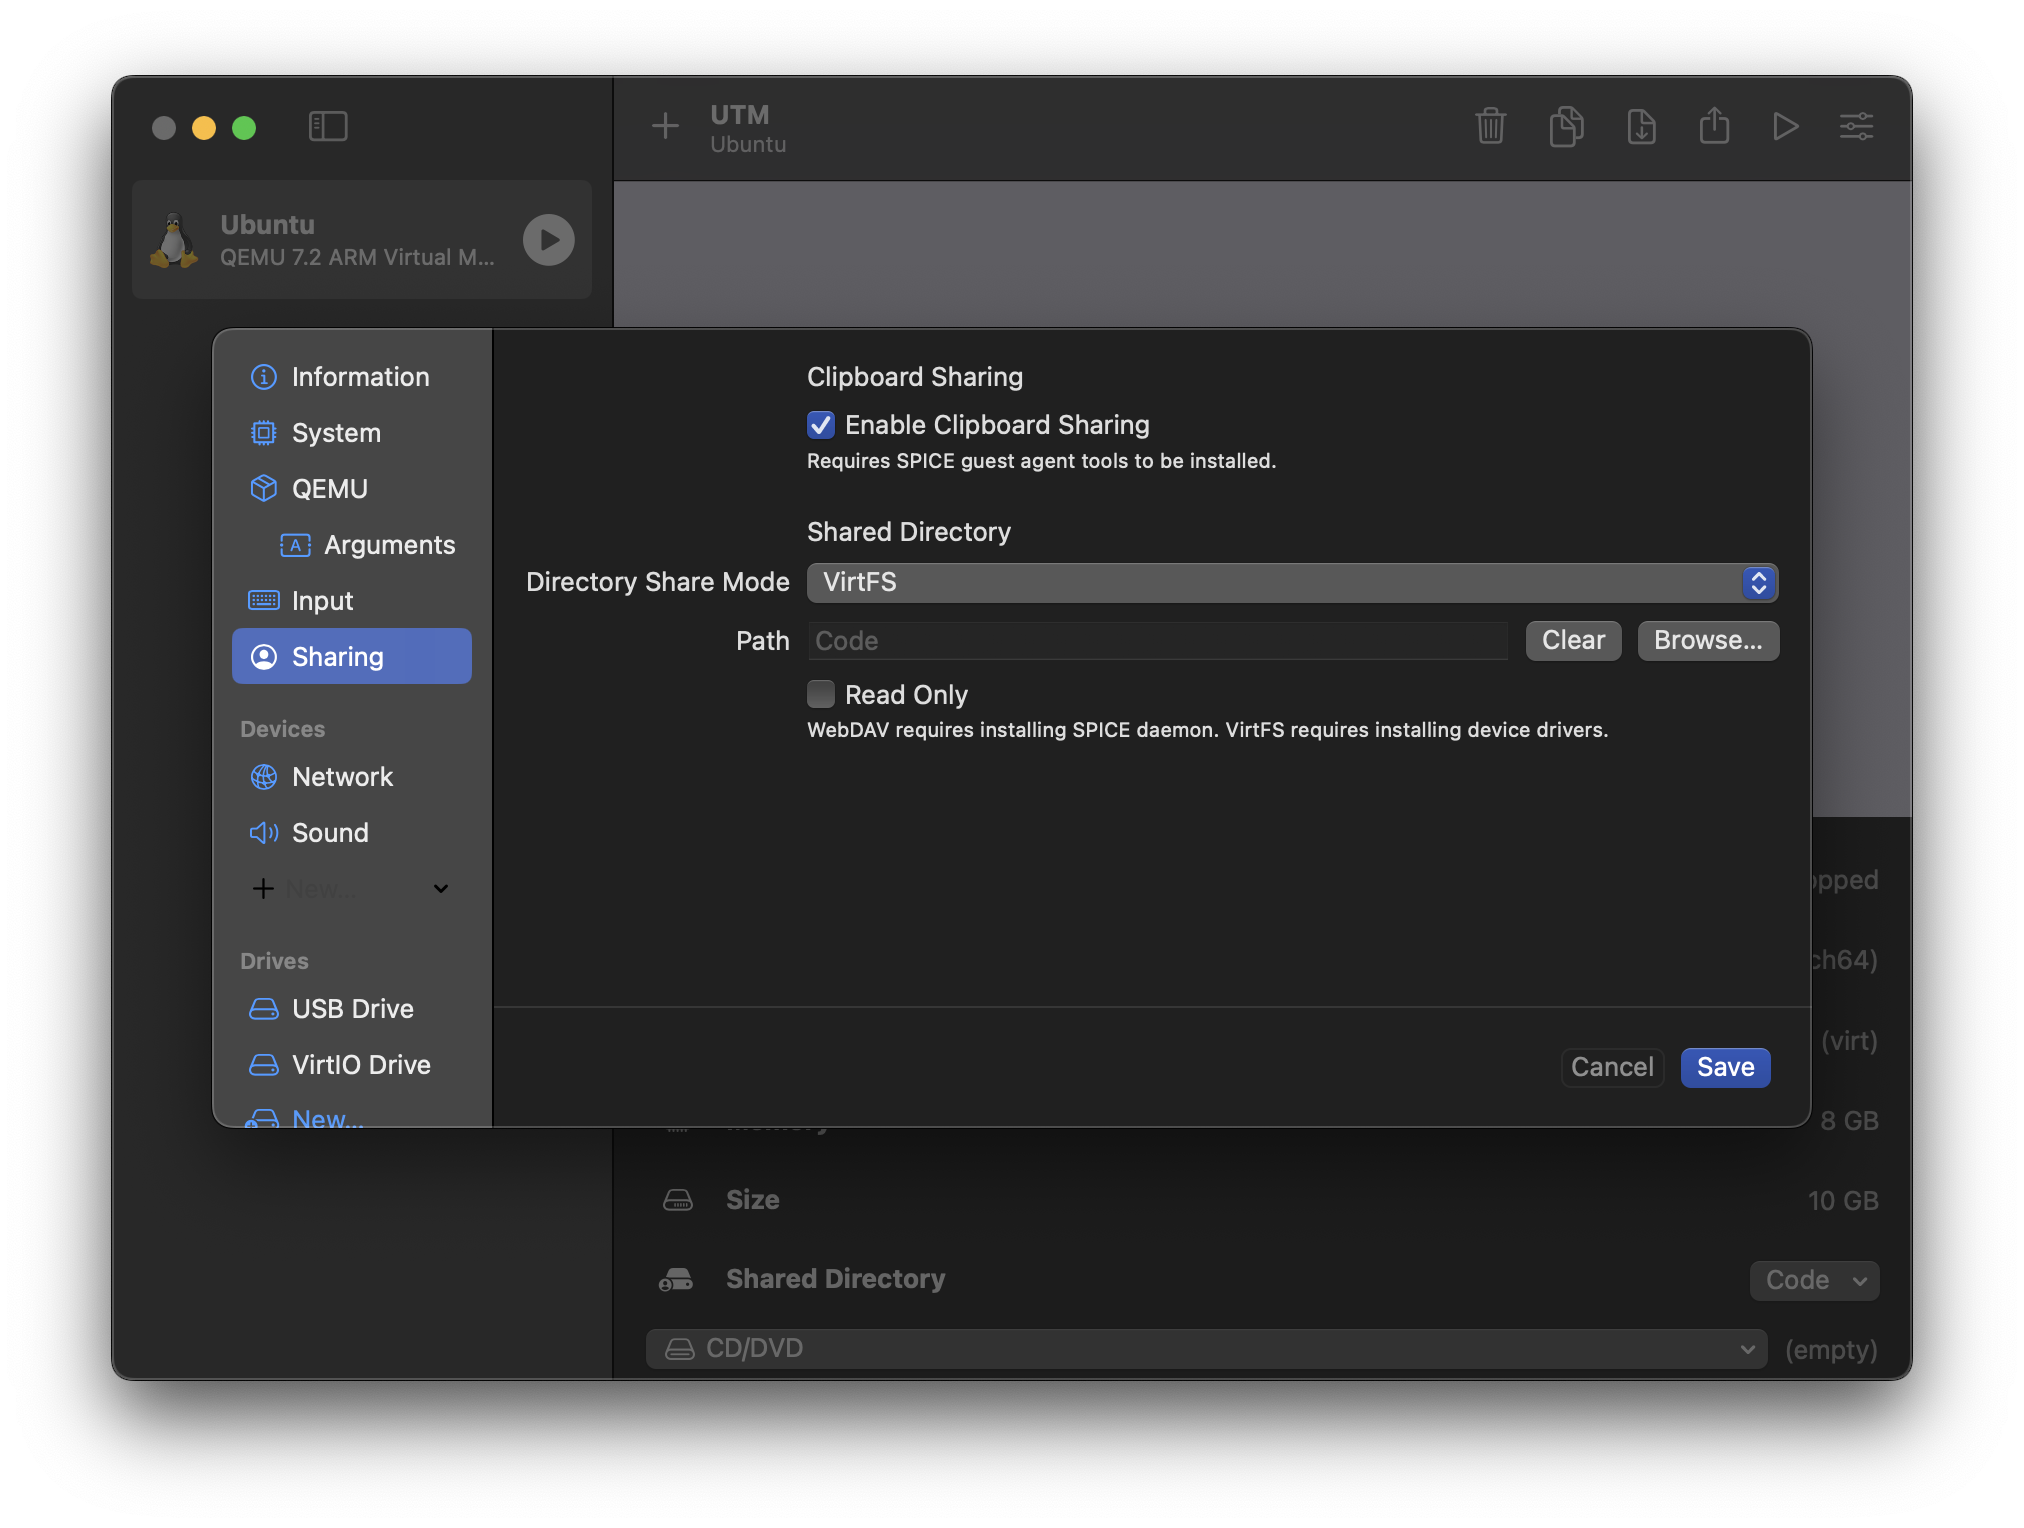
Now you can follow the guide UTM
has. Essentially, I set up the SPICE agent,
and then use VirtFS to
mount my Mac’s ~/Code directory in the VM’s ~/Code directory. Make sure you
also update your /etc/fstab so this mounting happens automatically on boot.
By default VirtFS file systems don’t belong to your user, so unless you’re SSHing
in as root (which you can do, nothing wrong with that), you’ll also need to take
ownership of the directories you intend to assemble code in. The same guide above
tells you how to do that.
With all this done, you’re ready to code. Whatever editor you use, open up a shell and SSH into the VM, navigate to the directory your code is in, and start working. You can then assemble and compile your code from the VM shell.
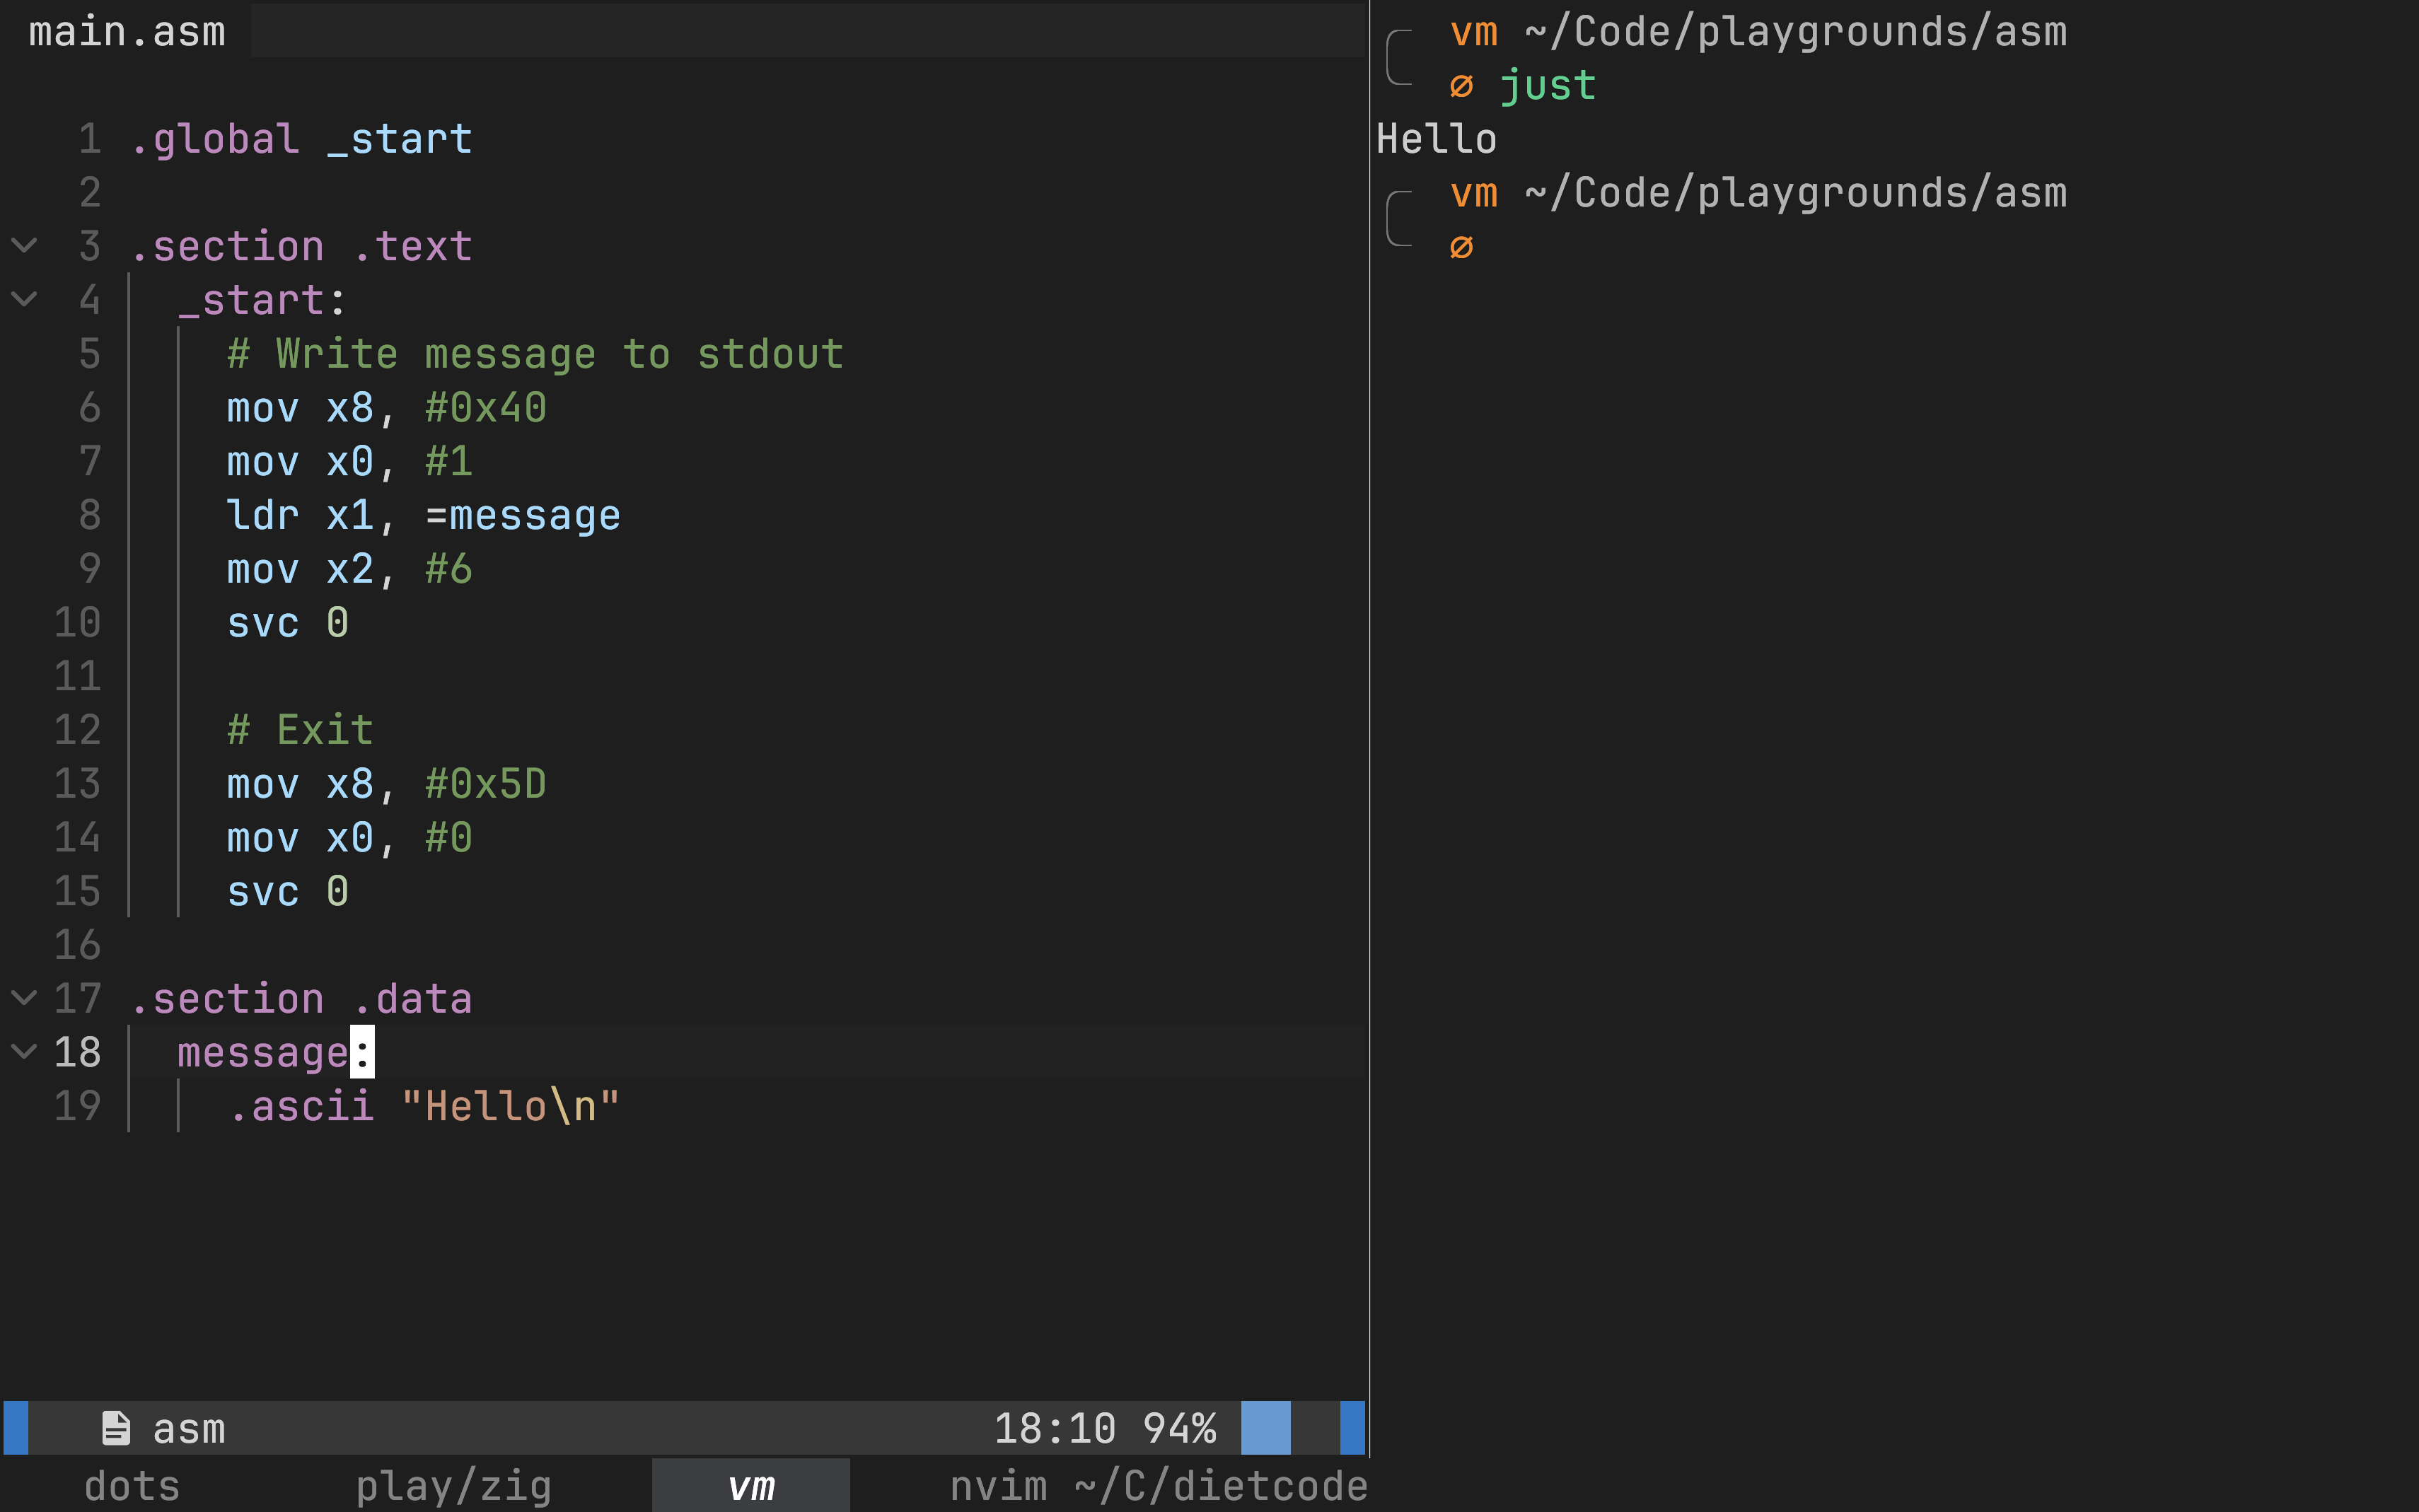
For posterity, here is my Justfile to do just
that:
default: run

assemble:
  @mkdir -p out
  @as main.asm -o ./out/main.o

build: assemble
  @gcc ./out/main.o -o ./out/main -nostdlib

run: build
  @./out/main
Extra: Why do I need to do this?
I expect beginners to land on this post, so I thought it’d be interesting to them to know why these shenanigans are necessary, because it was interesting to me.
The end-goal is always to generate machine code for your computer to run. When you write Assembly code, you’re writing it for your assembler, just like when you write high-level code, you write it for your compiler (like C or Rust). Saying you write “assembly” is like saying you write “high-level language” — you must say what language it is for your claim to make sense.
“Assembly”, then, is only a group of languages. Because you’re working at a lower level than say C, you don’t get the abstraction C has created over different kinds of processors and kernels. Any Assembly language code is going to have to deal with this variety, and so you generally write code for a specific CPU architecture AND kernel. The assembler that ships with 64-bit ARM Ubuntu only knows how to assemble code written for ARM64 + Linux. The assembler that ships with your M1 Mac only knows how to assemble code written for ARM64 + XNU (Apple / macOS’s kernel).
Because of the specifity of their work, assemblers generally only run on the platform they’re supposed to generate artifacts for. I don’t think (fact-check me if I’m incorrect) there’s a build of the ARM64 Linux assembler that runs on M1 chips. Even if there was, you’d still need an ARM64 Linux machine to actually run the machine code it generates.
To make matters worse, Assemblers also typically don’t “cross-assemble”: so the ARM64 Linux Assembler doesn’t know how to generate machine code that’ll run on Apple’s M1 chips, which are technically ARM64 chips, but the kernel that runs on macOS machines is XNU.
This is why you need a VM on an M1 Mac if you’re writing ARM64 Linux assembly — you’re writing code for an assembler that does not ship with macOS, and it generates machine code for a kernel that you’re not running.
You might wonder then, why I’m learning ARM64 Linux Assembly if I work on macOS. It’s mostly because learning resources for it are more abundant that XNU Assembly, but also I want to learn more about the Linux kernel, and I don’t want to buy real hardware that runs Linux yet (setting up a development environment like this on my Raspberry Pi is a whole other mess, I’ll tell you about it in a DM if you want).